Key takeaways
- An iPhone 13 Pro or newer has a built-in macro lens; older models just need an inexpensive clip-on to match the same close-up capability.
- Locking AE/AF with a tap-and-hold, then dragging exposure down slightly, is the single biggest quality jump you can make with no extra cost.
- A $20 tripod and diffused window light eliminate the two most common causes of unusable shots: blur and blown-out metal.
- Shoot each piece from at least three angles and review sharpness at 100% before moving on.
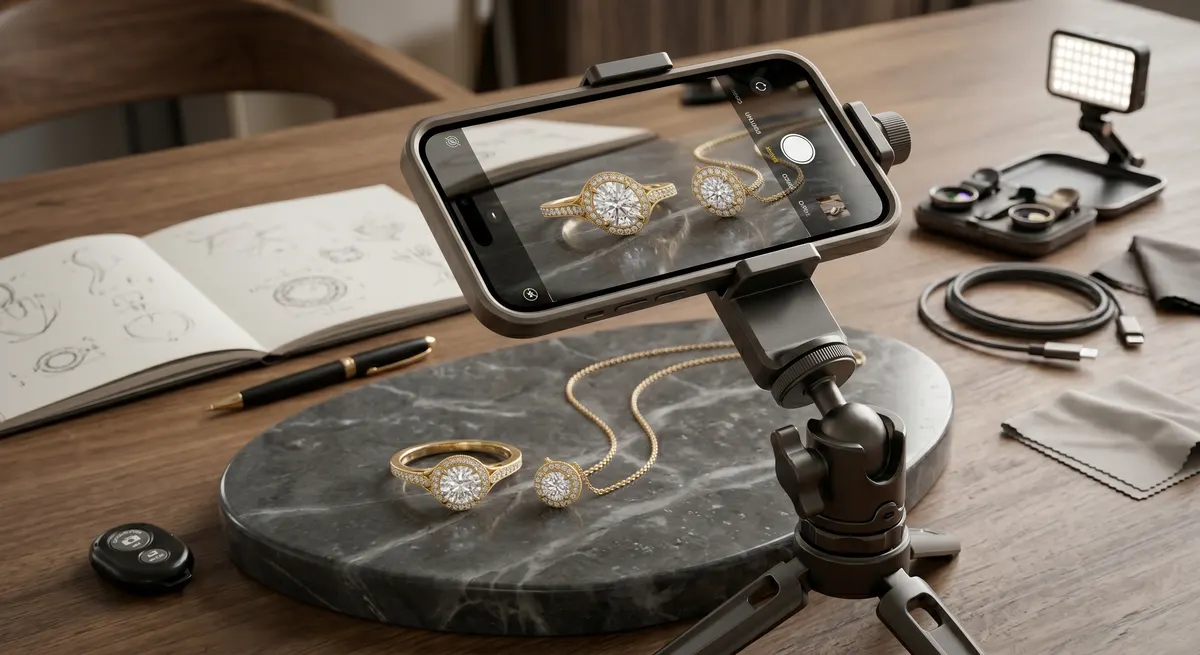
Gear You Actually Need
You do not need a camera bag full of expensive kit. For sellable iPhone jewelry photos, this short list covers everything:
iPhone with macro capability
iPhone 13 Pro or newer autofocuses as close as 2 cm; older iPhones pair with a clip-on macro lens (the Moment Macro 10x or a budget option under $20) to match the same reach.
Small tripod or gorillapod
Shake is the number-one killer of detail shots; a $20 phone mount clipped to a tabletop tripod keeps ISO low and lets you retake the exact same frame repeatedly.
Diffused light source
A window with a sheer curtain or a cheap light tent (around $30 online) replaces hard, direct sun that creates blown-out hot spots on metal no editing app can recover.
Plain backgrounds
White card stock, a matte gray tile, or a wooden surface keeps attention on the piece rather than a busy backdrop.
A lint roller
Metal and gemstones show fingerprints and dust at macro distances; one quick roll before each shoot saves minutes of cloning in post.
Setting Up Your Light
Window light is your best friend, and you do not have to buy anything extra to use it. Position your shooting surface at a 45-degree angle to a north- or east-facing window so the light comes in from the side rather than head-on. Direct overhead sun or a south-facing window at midday is too harsh - move to a shaded spot or tape a sheet of white tissue paper over the glass to diffuse it.
A light tent takes the guesswork out of reflections. Place the piece inside, point your iPhone through the opening, and the tent’s white panels bounce soft, even light from all sides. This is especially useful for highly polished silver or gold, where metal acts like a mirror and picks up everything around it.
If you are shooting at night or in a room without good windows, two identical daylight-balanced LED panels (5500-6000 K) placed at equal distances on either side of the piece mimic window light reasonably well. Avoid mixing light sources - a warm room light plus a cool LED produces a color cast that is tedious to fix.
Locking Focus and Exposure
This is the single setting that separates a sharp, sellable shot from a blurry one. Open the Camera app, switch to 1x (or the dedicated macro icon on iPhone 15 Pro+), then follow these steps:
Tap and hold to lock AE/AF
Tap and hold on the jewelry until you see the yellow AE/AF lock banner appear at the top of the screen.
Drag exposure down
Once locked, you will see a small sun icon beside the focus box. Drag it downward by about one-third to slightly underexpose.
Shoot
Capture the frame. If your phone keeps hunting for focus between shots, lock it again each time - the lock resets when you tap elsewhere.
Composing and Shooting
Move the phone until the piece fills roughly 70% of the frame. Too much empty background draws the eye away from the jewelry; too close and you lose context and clip the edges.
Shoot the same piece from at least three angles:
- Top-down flat lay - the go-to for Etsy listings; shows the full silhouette.
- Three-quarter view - reveals depth, stone setting height, and texture on the band or bezel.
- Side or profile - important for rings and bangles; shows thickness and stone profile.
Take at least three shots per angle without moving anything, then choose the sharpest. Use the volume button or an inexpensive Bluetooth shutter remote to avoid touching the phone and introducing vibration.
After each angle, zoom in to 100% in your Photos app and inspect the focal point. If the facets on the stone are slightly blurry, the focus locked onto the wrong spot. Relock, reshoot.
Editing on Your Phone
You do not need a laptop to finish these images. Two apps do most of the work:
- Lightroom Mobile (free tier) - use the Detail panel to bring back sharpness, then lift Shadows to open up dark areas inside stone settings. A small boost to Texture (not Clarity, which halos at macro distances) adds presence without looking processed.
- Snapseed - the Selective tool lets you paint brightness only onto a dull stone or shadow area without affecting the whole frame.
Keep edits restrained. On Etsy, buyers expect the photo to match what arrives in the post. Overcranking the vibrance on a sapphire and then selling a noticeably duller stone damages trust and triggers returns.
Export at full resolution for Etsy listings. Instagram accepts the same file, but crop to a 4:5 ratio (1080 x 1350 px) before uploading to maximize feed real estate.
Common Mistakes to Avoid
- Shooting handheld at macro distances. At 2-5 cm working distance, even the tap of the shutter button causes enough movement to blur the shot. Always use a tripod.
- Cleaning the piece after setting up the light. Handle it with clean cotton gloves, clean it before placement, and do not touch it again. Any fingerprint visible at normal viewing distance is glaring at 100% zoom.
- Mixed color temperatures. One daylight LED plus a warm incandescent overhead makes the background grey and the metal orange-yellow. Shoot with one consistent light source.
- Auto-HDR turned on. For jewelry, HDR often merges frames unevenly and creates ghosting on reflective surfaces. Check Settings, then Camera and turn off Smart HDR if your model has a manual toggle.
- Shooting on a cluttered surface. Even a tiny shadow from a pen off-screen can fall across the background and look like a stain. Keep the entire area around the piece clear.
For more on managing the reflections that come with polished metals and gemstones, see the guide on controlling reflections in jewelry photography. If you are ready to move beyond smartphone shooting, the overview on jewelry photography covers studio lighting, camera choice, and the full professional workflow.
Frequently Asked Questions
Which iPhone is best for jewelry photos?
Any model with a dedicated macro mode (iPhone 13 Pro and newer) works well; older models can use a clip-on macro lens.
Do I need a tripod?
Yes - a small tripod eliminates shake and lets you keep ISO low for cleaner detail.
Related guides

Keep exploring: the complete guide, gear reviews, pricing, or find a photographer.