Continuous vs Strobe: Which Light Source to Choose
The first decision every jewelry shooter faces is whether to use continuous LED lights or strobes. Both can produce excellent results, but they behave very differently on the bench.
Key takeaways
- Continuous LEDs give instant visual feedback as you move lights, making them easier for beginners to dial in precise shadow and highlight placement.
- Use CRI 95 or higher for any light source - lower ratings shift gold alloys muddy and make gemstone colors unreliable.
- A two-light setup (key at 45/45, fill at roughly half output opposite) covers 90% of still-life jewelry work.
- Light modifiers are not optional: bare sources create harsh specular hotspots that blow out polished metal and gemstone facets.
Continuous LEDs let you see exactly what the camera will see before you press the shutter. Move a light an inch and the shadow shifts in real time - that instant feedback is invaluable when you are dialing in the edge of a prong or trying to make a faceted stone pop. They also play nicely with live view and tethering software.
The non-negotiable spec for continuous lights: CRI 95 or higher. Lower CRI sources render gold alloys muddy, shift white metals toward green, and make gemstone colors unreliable. A cheap bi-color panel with CRI 85 will cost you in post-processing time and client corrections. Stick to 95+, and match color temperature across both heads - typically 5500 K for a neutral daylight look.
Strobes deliver more power in a smaller head, run cooler over long sessions, and freeze any vibration from a rotating turntable or macro rail. If your studio is already strobe-based, you can absolutely use them for jewelry. The trade-off is that you must shoot a test frame to evaluate every small light change. For beginners, continuous wins on feedback alone.
The Core Two-Light Setup
This arrangement works for 90 % of still-life jewelry work. Get these two positions right and you have a foundation you can tune forever.
Key light - large softbox at 45 degrees above:
- Use a softbox at least 60 x 60 cm (24 x 24 in). Larger modifiers wrap more gently around curved metal.
- Position it roughly 45 degrees to the side and 45 degrees above the subject plane, pointing down at the piece.
- Start at about 30-45 cm (12-18 in) from the subject for tabletop work. Closer = softer light with a shorter falloff gradient.
Fill - second softbox or white reflector opposite:
- Place a matching softbox on the opposite side, pulled back to roughly half the output of the key (about one stop under), OR simply set a large white foam-core card at a similar angle.
- The fill does not need to match the key exactly. Its job is to open up the shadow side so detail reads without going flat.
That’s it as a starting point. Two positions, one hierarchy.
Modifiers That Matter
Bare speedlights produce hard, specular hotspots that blow out polished metal surfaces and create uncontrolled reflections in gemstone facets. A modifier is not optional for jewelry - it is the product.
Large Softbox (60 x 60 cm or bigger)
The workhorse modifier: wraps curved metal without a harsh terminator line and works for nearly every jewelry subject.
Overhead Diffusion Panel
A sheet of white acrylic or diffusion fabric suspended above the piece creates an even light-tent effect, ideal for highly reflective silver or platinum work.
White Foam-Core Cards
Cheap and infinitely adjustable - keep a 30 x 60 cm card on hand to kick fill light under a ring or inside a bracelet.
Black Cards (Flags)
Used to subtract light rather than add it, flags control exactly where a bright catchlight falls on a curved band.
Reflector Discs
Portable and fast for location work, though harder to fine-tune for small subjects than a stationary card on a stand.
Shaping Shadows
Shadow work separates a flat product shot from an image with dimension and craft.
A long, soft shadow anchors a piece to its background and gives the viewer a sense of the object’s weight. A harsh, hard-edged shadow reads as cheap flash photography. To control the transition:
- Move the key light closer to soften the shadow edge.
- Move it farther away to harden and lengthen the shadow.
- Raise the key light higher to shorten the shadow cast onto the background.
- Use a flag on the fill side to let a defined shadow appear without going to a single-light setup.
For top-down flat-lay shooting on a copy stand or boom arm, place a large overhead diffusion panel between the lights and the subject. The result is nearly shadowless, which works well for catalogue backgrounds. Add a single angled card to one side to restore a hint of dimension if the image reads too flat.
White vs Black Backgrounds
The background color changes how you use your lights.
White background: you need the background to read pure white (255,255,255) in the final image. Light the background separately with a third head or by bouncing light off a white sweep below the piece. Keep the background exposure one to two stops brighter than the subject exposure. Watch for blown-out light spilling back onto the piece and washing out shadow detail - use a flag between background and subject if needed.
Black background: no additional light on the background at all - the goal is to starve it of illumination. Control spill ruthlessly with flags and barn doors on your softboxes. Black velvet is significantly easier to hold dark than black paper or fabric, because it absorbs rather than scatters the light that does reach it. With a dark background, specular highlights on metal can run very bright without looking wrong; that contrast is part of the look.
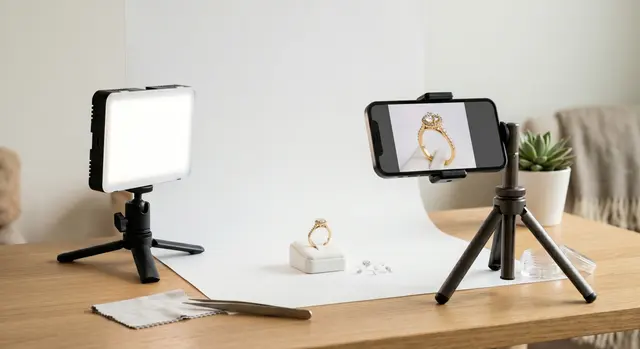
A Simple Starter Rig
If you are building from scratch, this is a workable entry point that does not require a large investment:
- Two continuous LED panels, 60 W output each, CRI 95+, bi-color 3200-5600 K
- Two 60 x 60 cm softboxes with an inner baffle and front diffusion panel
- Two adjustable light stands with boom or arm capability
- One 60 x 60 cm white foam-core card
- One 30 x 60 cm black foam-core card
- A small sweep of white acrylic or white paper roll (60 cm wide)
Set both panels to 5500 K, mount the softboxes, and place key left at 45/45, fill right at roughly 45/45 but dialed back in output. Place the white card below and slightly toward the camera to bounce light up under the piece. Shoot tethered or use live view. Adjust from there.
That rig handles rings, earrings, pendants, and bracelets. Add an overhead diffusion panel when you move to bracelets and necklaces that require even wrap, or when you shoot polished silver that picks up every hot spot in the room.
For techniques on eliminating unwanted reflections in polished metal, see Control Reflections in Jewelry Photography. For a comparison of specific light heads and panels, see the Best Lighting for Jewelry Photography gear guide.
Related guides

Keep exploring: the complete guide, gear reviews, pricing, or find a photographer.