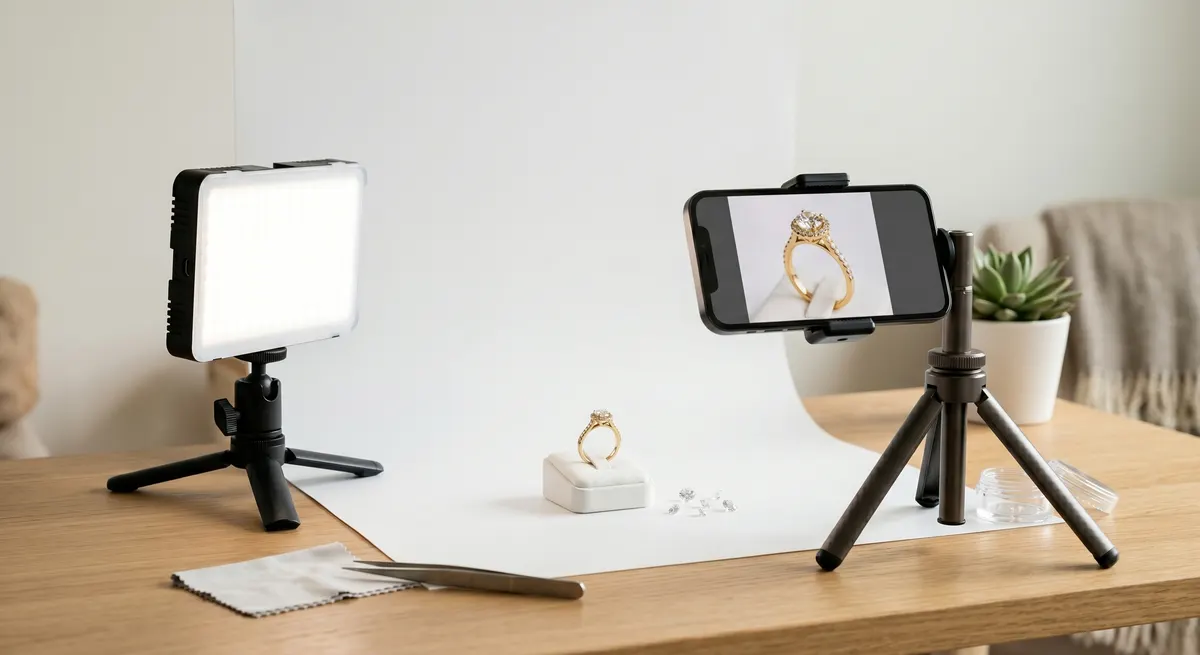
You do not need a studio to shoot jewelry that sells. A north-facing window, a couple of foam boards, and a phone on a tripod can produce clean, sharp images that hold up on an e-commerce listing or a social feed. Here is exactly how to build that setup for around fifty dollars.
Key takeaways
- Indirect window light outperforms most artificial setups for under-fifty-dollar budgets.
- A white foam board bounce card eliminates harsh shadows without any extra gear.
- Cleaning each piece before every shot is the single biggest quality improvement most home photographers can make.
- Lock your camera on a tripod and shoot multiple frames per angle to guarantee at least one keeper.
The $50 Kit
Everything below is available at a dollar store, craft shop, or on a budget marketplace. Buy it once and it lasts for years.
| Item | Approx. cost |
|---|---|
| Pop-up light tent (40 cm or 16 in) | $15-20 |
| Two sheets of white foam board (20 × 30 in) | $4-6 |
| Sheer white curtain panel (fabric store offcut or dollar store) | $2-4 |
| Phone / compact-camera tripod (small flexible or desk tripod) | $8-12 |
| White A3/tabloid cartridge paper (pack of 50) | $4-6 |
| Small sheet of clear acrylic or picture-frame glass | $4-6 |
| Blu-Tack or museum putty | $2-3 |
| Total | ~$40-52 |
That leaves a few dollars for the one thing people forget: a lint-free lens cloth and a soft brush to clean the piece before every shot.
Finding the Light
Natural light from a large window is the best free resource in jewelry photography. The goal is soft, indirect daylight - not a beam of direct sun, which blows out metal and creates harsh shadows you cannot fix in post.
Choose a north- or east-facing window
In the Northern Hemisphere, north light stays consistent all day. East light is soft in the morning and gone by noon.
Shoot on overcast days
The cloud layer acts as a giant softbox. If the sky is clear, tape or clip a sheer curtain across the window to scatter the light.
Position the piece at a 45-degree angle to the window
Shoot within one to two metres of the window. Move your table until the piece is lit from the side rather than front-lit or back-lit.
Close all other blinds
Mixed light sources create mixed color temperatures, and the resulting color cast is difficult to remove cleanly in post.
Building the Set
The bounce card
Place a sheet of white foam board on the shadow side of the piece, angled toward it at roughly 30-45 degrees. This bounces window light back into the dark areas and reduces the contrast ratio from harsh to natural. Move it closer to the piece to brighten the shadow; move it farther away to let more shadow remain for depth.
The light tent
The pop-up light tent is optional but earns its keep when shooting highly reflective pieces - polished gold, silver, or gemstones with mirror-like facets. It wraps the piece in a sphere of diffused light and eliminates reflections of the room. Shoot through the opening with the tent facing the window.
Backgrounds
- White cartridge paper curved up the back of the tent or taped to the foam board gives a seamless white background - the cleanest option for listings.
- Clear acrylic sheet laid flat and lit from the side creates a subtle reflection beneath the piece. It reads as upscale and works well for rings and pendants.
- Textured surfaces (linen fabric, slate tile, aged wood) add lifestyle context. Keep them dark enough to not compete with a light-colored piece, or light enough to not muddy a dark piece.
Posing the Piece
This is where most home setups fall apart. A piece that moves even half a millimeter between frames ruins a focus-stack series and wastes time.
- Clean everything first. Use the soft brush to remove dust, then the lint-free cloth for fingerprints. Oils from fingertips show as haze on metal under any decent light.
- Use Blu-Tack to hold the piece. Roll a small amount and press it under the base of the piece or inside a ring band. It is invisible in frame and holds the angle you set.
- Rings: lean them against a small blob of Blu-Tack, or lay them flat on the acrylic sheet.
- Necklaces and chains: drape them on a curved piece of paper, a stand, or a jewelry bust - or shoot flat-lay style on the background. Keep the chain arranged with no overlapping links.
- Earrings: shoot as a matched pair, spacing them to fit comfortably in the frame. A strip of foam board propped upright makes a clean mounting surface.
Shooting
Once the set is built and the piece is clean and posed, the actual shooting goes quickly.
- Lock the camera on the tripod. Any camera movement between shots softens the focus. Even on a phone, use the self-timer or a Bluetooth shutter release to avoid pressing the screen.
- Set exposure manually if your camera allows it. On a phone, tap the piece to set focus, then drag the exposure slider down a stop if the white background is blowing out.
- Shoot in RAW if available. It gives far more flexibility when correcting white balance and brightness. If your phone only offers JPEG, set white balance to “cloudy” for window light.
- Take more frames than you think you need. Shoot three to five images at each angle - you will almost always find one where the light has landed better than the others.
- Standard angles: top-down (flat-lay), front-facing at 45 degrees, close-up on the clasp or stone setting, and one lifestyle or styled shot. That covers most listing requirements.
When to Upgrade
The $50 setup has real limits. When you hit them, the next logical investments are:
- A dedicated macro lens (or clip-on macro for phones) - when you need sharp detail on stone settings or engraving at very close range.
- A continuous LED light panel ($30-60) - when natural light is unreliable due to your location, season, or shooting schedule.
- A proper light tent with built-in LED strips ($50-80) - when you are shooting high volumes and cannot afford the time to set up and tear down each session.
- A mirrorless camera with a 60 mm macro lens - when client work or wholesale buyers require print-resolution files and the phone sensor is the bottleneck.
Start with what you have, get consistent with the window-and-foam-board workflow, and upgrade only when a specific problem - not a vague feeling - is holding your work back.
For a deeper look at controlling light on reflective surfaces, see the guide on jewelry photography lighting. If you are researching the full range of equipment and technique options, the jewelry photography overview is a good starting point.
Related guides

Keep exploring: the complete guide, gear reviews, pricing, or find a photographer.