Key takeaways
- Bangles and rigid cuffs hold their form on their own; chain and link bracelets need a putty support or a clear ramp to stay round for the shot.
- Always include a dedicated clasp shot so buyers can see the closure mechanism clearly.
- Flat lay gives you the cleanest ecommerce image; an on-wrist or on-ramp shot adds scale and shows how the piece drapes.
- Wrap light around the full curve with a large softbox or overhead diffusion panel to avoid dark zones on the far side.
Shaping the Bracelet Before You Shoot
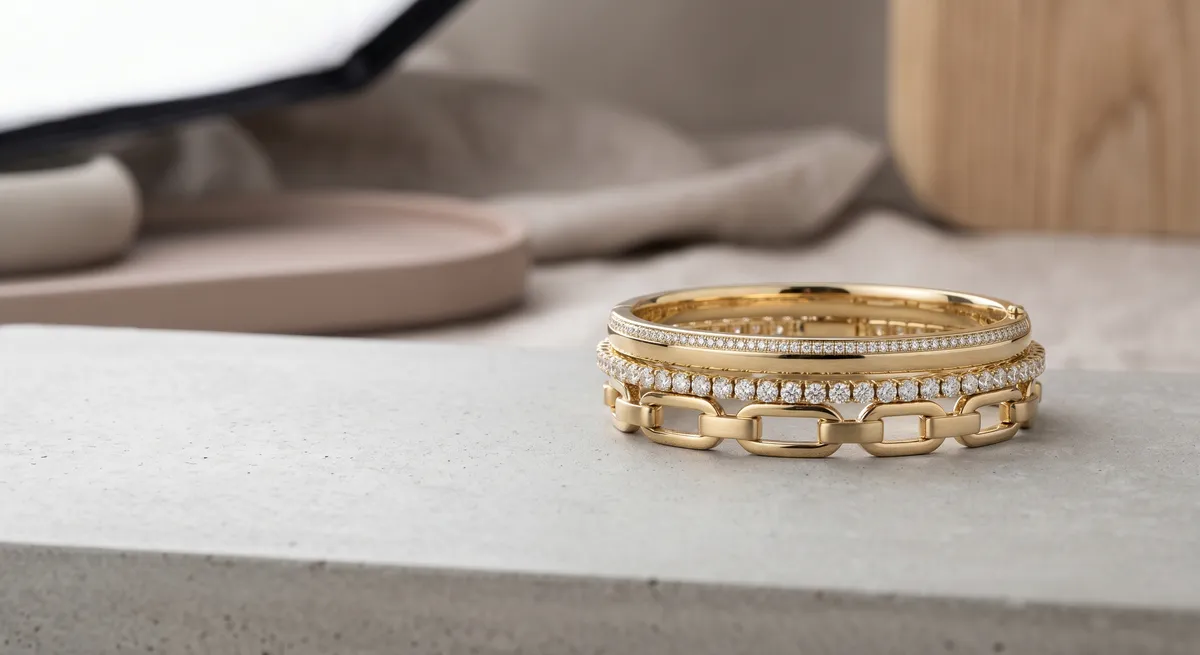
The biggest difference between a bracelet shot that looks professional and one that looks careless is shape. A chain bracelet dropped flat on a surface becomes a shapeless pile. You need to give it structure before the camera comes out.
Bangles and rigid cuffs are straightforward. They hold their own form, so styling them is mostly about angle and orientation. Lay a bangle flat for a front-on oval, or tilt it slightly toward the camera so the interior is partially visible. A cuff can be placed open-side down to show the exterior, or propped on its edge to show profile and depth.
Chain and link bracelets are the real challenge. The goal is a soft round or oval shape that reads as intentional, not incidental. Two approaches work reliably:
- Putty or museum wax: Form the bracelet into a round on the surface, then place small pieces of putty underneath the chain at the top, bottom, and sides to hold the curve. The putty stays out of frame or gets retouched if it catches light.
- Clear acrylic ramp: A small transparent ramp lets the bracelet drape over the curve naturally, giving it the rounded shape it would take on a wrist without requiring a wrist in frame. The ramp disappears against a light background or can be removed in post.
For charm bracelets, arrange the charms so they are spread around the outside of the curve rather than clumped together. Photograph them on a flat lay first so each charm is visible, then do a secondary shot with a few charms deliberately arranged for a styled look.
Showing the Clasp and Detail
Buyers examine clasps. They want to know whether the closure is a lobster claw, a box clasp, a toggle, or a magnetic closure, and they want to see it operating clearly. A listing with no clasp shot leaves buyers with a question they may not bother to ask before clicking away.
Dedicate at least one shot to the clasp. Close enough so the mechanism is readable, with enough context to show how it attaches to the chain or band. If the clasp has a hallmark or a logo stamp, include that in the same frame or in a separate macro shot.
For bracelets with stones, a macro shot of the setting is worth including. Show the prong or bezel construction, the surface of the stone, and any engraving or texture on the metal near the setting. These shots build the case for the price point without requiring a word of copy.
Flat Lay vs. On-Wrist vs. On-Ramp
Flat Lay
The standard ecommerce shot. Clean background, overhead or slightly angled camera, piece shaped and styled. Works for every bracelet type and is easiest to keep consistent across a catalog.
On-Wrist
Adds human scale and shows how the bracelet drapes, sits, or stacks. Essential for buyers who want to see proportion. Use a clean hand and wrist with neutral nail polish or bare nails.
On-Ramp or Stand
A clear acrylic bracelet ramp or a small display stand gives the piece its natural curve without requiring a model. Good for listings where you want a middle ground between flat lay and lifestyle.
Stacked
If the bracelet is meant to be worn with others, shoot a stack. Show how it layers with complementary pieces. This doubles as a cross-selling image.
For most product listings, lead with the flat lay as the hero thumbnail. It reads clearly in a marketplace grid, converts consistently, and keeps your shop looking uniform. Follow it with an on-wrist or ramp shot to answer the scale question. If the piece is designed for stacking, add a stack shot as the third or fourth image.
Lighting Around a Curved Form
A bracelet is a ring. Light that hits the near side will not automatically wrap around to the far side, and the difference in brightness between the top of the curve and the underside can be large enough to lose detail in shadow.
The fix is a large modifier or a full wrap setup:
- Large softbox at 45 degrees above: Moves light across a wide area. Position it high enough that it illuminates both the top and the near sides of the bracelet. Add a white fill card on the opposite side to open up the shadow.
- Overhead diffusion panel: Suspend a sheet of white acrylic or diffusion fabric above the piece and place lights on either side pointing up at the panel. The panel becomes a giant even source that wraps around the full circumference. This is especially effective for polished bangles and silver bracelets.
- White fill card below: For flat lay shots, slide a small white card under the front edge of the bracelet frame to bounce light back up under the chain links. This eliminates the dark underside shadow that makes links read as flat rather than dimensional.
Metal tone matters for light temperature. Yellow gold reads warmest at 5000 to 5500 K. Rose gold sits between warm and neutral. White gold and silver are most accurate at 5500 K. Mixing light temperatures across a shoot will shift metal color between frames and create extra correction work in post. Set a fixed color temperature and use a gray card to calibrate.
Backgrounds for Bracelet Photography
The background you choose affects how the bracelet reads and how much retouching you will need.
White or off-white is the standard choice for ecommerce. It puts all the emphasis on the piece, matches marketplace conventions, and makes it easy to isolate the subject if you need a clipping path. The one risk with a polished bangle on white is that the reflection of the white surface reads on the metal. Manage it with a small black card placed behind and below the frame to create a dark zone the metal reflects, giving the band some definition.
Black or dark backgrounds work well for high-contrast precious metal shots. A polished silver or white gold bangle on black velvet reads with clear edges without any background retouching. The velvet absorbs stray light, so you can run your softboxes at full output without worrying about the background washing out. This is a good choice for dramatic hero shots rather than catalog listings.
Textured neutrals such as linen, slate, or marble add character to lifestyle and editorial shots. Keep them muted enough that the texture does not compete with the bracelet at small thumbnail sizes.
Whatever surface you choose, use the same one across all images in a shoot so the listing feels cohesive.
For guidance on photographing pieces that need similar shaping and lighting decisions, see how to photograph necklaces. For ecommerce listing strategy including shot lists and thumbnail testing, see the guide on Etsy jewelry photography. For a full overview of lighting setups that work across every jewelry category, visit jewelry photography.
Frequently Asked Questions
How do I make a chain bracelet hold its shape for photos?
Form it into a soft round or oval using putty or a small support out of frame, or rest it over a clear ramp so it keeps a natural curve instead of lying flat.
Flat lay or on-wrist for bracelet photos?
Flat lay gives a clean ecommerce shot; an on-wrist or on-ramp shot shows scale and how the bracelet sits. Use both when you can.
Related guides
Keep exploring: the complete guide, gear reviews, pricing, or find a photographer.