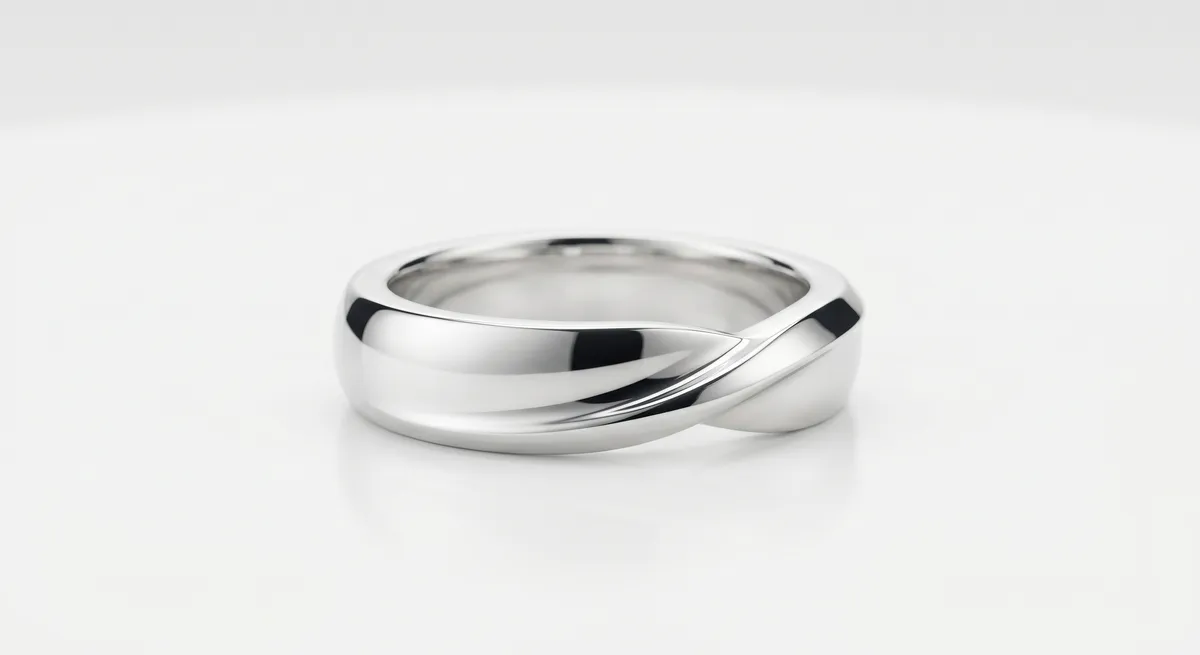
Silver Is a Mirror
Silver is not simply a shiny metal. At a photographic level, polished sterling or fine silver behaves like a mirror: it records everything in its environment and projects it back at the camera. Point a lens at a bare silver ring under a ceiling fixture and you will see the bulb, the room, your shirt, and the camera itself all competing for space on the metal’s surface.
This is the core challenge. Gold is warm-toned and slightly absorbs color, which gives it some visual identity even in difficult light. Silver has almost no color of its own. Every highlight, every reflection, and every color cast in the room becomes part of the image. That means you cannot fix silver photography by adjusting one light; you have to manage the entire visual environment the piece sits inside.
The good news is that the same mirror-like quality that causes problems also produces the most elegant results when you control it. A well-lit silver piece with clean white gradients and precise dark edges reads as bright, expensive, and precise. Getting there is a matter of systematically reducing every variable the metal can see.
Key takeaways
- Silver mirrors its whole environment, so you must control the room, not just the light.
- A light tent or full diffusion enclosure replaces the room with a soft white field.
- Black flag cards add the crisp dark edges that make silver look polished rather than flat.
- White balance set with a gray card keeps silver neutral instead of blue or warm.
- Tarnish and fingerprints are invisible to the eye but show clearly at macro distances, so clean the piece before every setup.
Cleaning and Tarnish Prep
Before you place a piece on set, it has to be perfect. Silver oxidizes and develops a yellow or dark patina wherever it is handled, even if you cannot see it under room lighting. A macro lens at f/8 will find every smudge, every fingerprint, and every micro-scratch that polishing left behind.
Start with a lint-free silver polishing cloth and work the entire surface systematically. Pay attention to settings, prong bases, and inner curves where tarnish collects first. If the piece has heavy oxidation, a quick pass with a silver cleaning solution before the cloth stage removes what polishing alone cannot reach.
From that point forward, use cotton gloves or rubber-tipped tweezers whenever you touch the piece. One bare-handed repositioning undoes five minutes of cleaning. Keep a clean cloth on the set edge so you can touch up between shots without lifting the piece off its positioning tape.
Light Tent and Full Enclosure
The most reliable way to photograph polished silver is to enclose the piece inside a light tent. A light tent is a fabric cube with diffusion panels on every face. Push your lights against the outside panels and the piece inside sees nothing but soft white diffusion in every direction. The result is a smooth, even gradient across the metal rather than a chaos of room reflections.
For silver specifically, the tent solves two problems at once. It eliminates the room from the reflection, and it gives you a predictable starting point that you can then shape with flags. Without the tent baseline, you are fighting every ambient surface in the shooting space before you can even begin making creative decisions.
If you do not have a light tent, you can build the same effect with two large white foam-core panels standing at angles on either side of the piece, with a third panel overhead and a diffusion sheet between the lights and the subject. It is less consistent than a tent but produces similar results for smaller budgets.
Black and White Flags to Shape Reflections
A light tent alone makes silver look clean, but it can also make it look flat. When the metal sees only uniform white in every direction, there is no contrast across the surface, no sense of edge, and no visual depth. The piece reads as pale gray rather than bright silver.
Black flag cards solve this. A black card placed just outside the tent opening, or held just out of frame on an open set, creates a dark reflection that runs along the curved edge of the metal. That dark stripe is the contrast that makes silver read as polished and three-dimensional. Without it, the metal has no edge definition and appears dull.
Black Flag (Shadow Card)
Creates a crisp dark edge reflection on curved silver surfaces. Place it just outside frame on the side opposite your main light and shift it by centimeters until the edge snaps into definition.
White Fill Card
Bounces gentle fill into the shadow side of the piece. Keeps silver from going fully dark on one face while preserving the contrast that the black flag creates on the opposite edge.
Tent Wall as Background
The back panel of the light tent doubles as a neutral background. Keep it evenly lit and it reads as clean white in camera without needing a separate sweep.
Matte Black Camera Shield
A sheet of black foam-core with a hole for the lens barrel stops the camera itself from reflecting in flat or gently curved surfaces directly in front of the piece.
Use live view to place flags precisely. Move each card a few millimeters at a time and watch what changes on the metal surface. The transition from flat to three-dimensional is often a matter of moving a black card two centimeters. Mark the position with a piece of tape on the table once you find it, so you can repeat the setup for the next piece in the same collection.
Neutral White Balance
Silver has no warm color of its own, which means it picks up whatever color the light source or surrounding surfaces give it. Under tungsten bulbs, silver looks warm yellow. In shade or under certain LED panels, it goes blue. A colored sweep or background reflects back onto the piece and shifts the whole metal surface toward that hue.
Set white balance manually before every shoot. Use a gray card placed where the piece will sit, take a reference shot, and set that as a custom white balance in camera. Alternatively, shoot raw and correct white balance in post using a gray card reference, but doing it in camera means you spend less time fixing the same problem across an entire batch.
Keep the set neutral. White backgrounds, gray cards, and matte black flags do not contribute color casts. Colored sweeps, colored props, and walls near a window can all bleed onto the metal. If something nearby has strong color saturation and you cannot remove it, flag it off.
Polished vs Oxidized and Matte Silver
Not all silver finishes behave the same way in front of a camera.
High-polish silver is the most demanding surface. It reflects at full intensity and shows every environmental variable. Everything in this guide applies most urgently to this finish. The reward is images with bright, clean highlights and a premium appearance that is hard to achieve with other metals.
Oxidized silver has a deliberately darkened surface, often with polished raised areas and dark recessed detail. The contrast between the two finishes is what makes the piece visually interesting, and your lighting has to preserve it. Use less fill than you would for plain polished silver; too much fill washes out the intentional dark areas and makes the piece look muddy rather than antiqued.
Matte or brushed silver scatters light in many directions rather than reflecting it as a single mirror image. The surface still picks up color casts, so white balance still matters. But it is far more forgiving about reflections. You can shoot a brushed silver piece with simpler lighting and fewer flags than you would need for the same piece in a polished finish.
When a collection includes both polished and oxidized or matte pieces, shoot the polished pieces first while your setup is fully optimized for maximum reflection control. Matte pieces can then be shot with a simplified version of the same setup.
For a closer look at managing reflections across all metal types, see Control Reflections in Jewelry Photography. For the full lighting approach that underpins these techniques, see Jewelry Photography Lighting. A broader overview of the entire workflow, from setup through editing, is available at Jewelry Photography.
Frequently Asked Questions
How do I stop silver from looking gray or dull?
Light it inside a tent for clean soft reflections, then add black cards just out of frame to create dark edges that make the silver read bright and three dimensional.
Why does my silver look blue or warm?
That is a white balance or color cast issue. Set white balance with a gray card and keep colored surfaces out of the set.
Related guides
How to Photograph Gold Jewelry

How to Eliminate Glare & Reflections on Jewelry
Jewelry Photography Lighting Setup
Keep exploring: the complete guide, gear reviews, pricing, or find a photographer.