Key takeaways
- The invisible mannequin effect removes the bust in post, leaving the necklace floating in its natural worn shape.
- You need two frames: one with the necklace on the bust, one clean background plate with the bust removed.
- A tripod and locked framing are not optional: any camera shift between the two frames breaks the composite.
- Contrasting bust color against the chain makes masking significantly faster and cleaner.
What the Invisible Mannequin Effect Is and When to Use It
The invisible mannequin effect, also called the ghost mannequin or ghost form technique, shows a necklace in its worn shape with the supporting bust edited out entirely. The result is the piece appears to float against a clean background, displaying drape, length, and pendant position as it would look on a person, without a visible model or stand.
It is the right approach when a flat lay does not tell the full story of how a piece falls. Long pendant necklaces, layered chains, and statement pieces benefit most: a flat lay can show the pendant design in detail, but it cannot show how far the pendant drops from the collarbone or how the chain flows across the chest. The invisible mannequin shot does both. It is also consistent across a catalog because every image uses the same bust, framing, and background.
Gear You Need
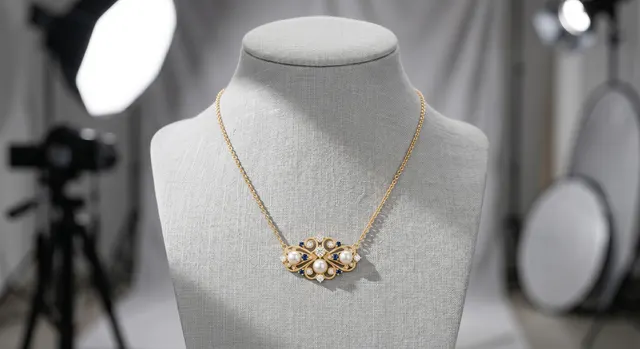
Neckform or bust. A plain, matte-finish form in a neutral tone works best. Avoid forms with visible texture or seams, as they complicate masking. Choose a bust color that contrasts with the metal you are shooting: a mid-grey or matte black bust gives good separation against gold or silver, while a light cream or white form makes masking silver chains slow and difficult.
Tripod. The two-plate method requires the camera to be in exactly the same position for both frames. Even a small shift will misalign the composite and create visible halos or gaps along the chain edges. Lock the tripod, use a 2-second timer or remote shutter release, and do not touch it between shots.
Diffused light. A large softbox, overhead diffusion panel, or light tent wraps each chain link in even, consistent light. Harsh or directional light produces speckled hotspots that are difficult to retouch. Keep light position and power identical for both frames.
Cotton gloves and a lint-free cloth. Clean the piece first, then handle it only by the clasp. Fingerprints on metal show clearly at shooting distance.
The Two-Plate Shooting Method
The composite is built from two frames shot in sequence without moving the camera.
Frame one is the necklace on the bust. Dress the necklace on the neckform, adjust the chain into its natural fall, and make sure the pendant is face-forward. Check framing through live view so the camera does not shift, then shoot the primary exposure.
Frame two is the background plate. Carefully lift the neckform aside without disturbing the tripod, lights, or background. Shoot the empty scene at the same exposure settings. This plate fills the area where the bust was during compositing.
Set a fixed manual exposure and disable auto white balance before shooting. Any change in exposure or color temperature between the two frames makes the blend harder to match convincingly.
Editing and Masking Steps
Stack both frames in Photoshop
Open the bust frame and place the background plate as a layer directly beneath it. Align them precisely using Edit > Auto-Align Layers if needed, though with a locked tripod they should already be pixel-accurate.
Select the bust on the top layer
Use Select > Subject or the Object Selection tool to generate an initial selection of the neckform. This gives you a rough mask to start from. Do not worry about the chain at this stage: the initial AI selection will not handle fine chain links accurately.
Add a layer mask and invert it
With the bust selected, add a layer mask and invert it so the bust area becomes transparent, revealing the clean background plate beneath. The necklace should remain visible on the top layer.
Refine the mask edge around the chain
Zoom to 100 percent and paint the mask manually along the chain edges using a small, hard brush. Work segment by segment around each link. For fine cable chains, a 1-pixel or 2-pixel brush at full opacity gives the cleanest result.
Blend the background plate
Check the transition between the background plate layer and the retained necklace area for any exposure or tone mismatch. Use a Curves or Levels adjustment clipped to the background plate layer to match the two layers visually.
Clone out any remaining bust artifacts
Flatten a merged copy of the visible layers and use the Clone Stamp or Healing Brush to remove any residual bust edges, stray shadows, or form-related marks that survived the mask.
Refining the Neckline
The neckline is where the effect either reads as a photograph or reveals itself as a composite. The goal is a clean, natural-looking inner curve that suggests the necklace rests against skin.
Zoom to the inner curve of the form and work the mask edge with a small brush, following the natural shape of a neckline rather than a geometric arc. Check that any chain links running close to the neckline are fully retained in the mask: it is easy to clip inner links when masking aggressively. Paint white on the mask to restore clipped links if needed.
A faint, soft shadow added on a Multiply layer beneath the chain can help the piece read as grounded rather than pasted in. Keep it subtle.
Common Mistakes
Shooting handheld. Any shift between the two frames creates edge artifacts along every chain link that require re-shooting to fix.
Using a bust that matches the chain color. A silver chain on a grey-silver form has no tonal contrast for selection tools to work with, making manual masking very slow. Shoot on a contrasting background instead.
Changing the light between frames. Moving a reflector or letting window light shift produces a background plate that does not match the original, leaving a patchy composite where the bust was.
Skipping the background plate and using Content Aware Fill instead. Generative fill handles small gaps but cannot convincingly reconstruct a large, complex background area. A real plate is always faster and more accurate.
Making the neckline too perfect. A mathematically circular arc looks like a cut-out. Real necklines vary slightly; let the mask follow the form naturally.
For the foundational necklace shooting techniques that precede this effect, see the full guide on how to photograph necklaces.
For speeding up the masking and retouching steps with AI tools, see the AI jewelry retouching workflow guide.
For the complete overview of jewelry photography from camera setup to final export, visit the jewelry photography guide.
Frequently Asked Questions
What is the invisible mannequin effect?
It shows a necklace in its worn shape with the stand or bust edited out, so the piece appears to float.
Do I need special gear for it?
A neckform or bust, a tripod, and consistent light. The effect is finished in editing with a background plate.
Related guides
How to Photograph Necklaces

AI Retouching & Background Removal Workflow

Jewelry Photography Backgrounds
Keep exploring: the complete guide, gear reviews, pricing, or find a photographer.